Monday, February 25, 2013

Day 169


Now another animation with the dog riding the scooter. Above I've posed the dog on top of the scooter. I bent back the ears for the wind swept look.


Then I drew a line winding down the alley for the scooter to follow. I had the scooter bank side to side as it weaved down the alley. I made the tail sway side to side too but you can't really see that in these videos. I also made the handles and front wheel turn before the scooter turns but that isn't too noticeable either. Lastly, the book wanted me to make the dog pop a wheelie so I did that and added in some tweaks to make he dog react to landing back on the ground. I decided to make the head lights glow cuz it looked weird without it. Finally I animated the camera to capture everything.

Day 168


Now I get to animate something that isn't walking. Here I'm having the dog jump onto the scooter. Above you can see the main poses I created for the jump.


So I could see better what I was working on, I turned off the visibility of all the buildings. However, I left the lights on so that's why you can see the lens flare in the video.


I also animated the scooter a little bit so it looks like the dog is actually landing on it.


After finishing with the jump, I imported in the walking animation as well and sequenced it in front of the jump and blended the two actions together. Then I created a camera that I also animated to follow along the the dog's movements. Above on the left, you see the camera flowing in the scene and on the right you can see what it looks like through the camera. Below I have the final animation with the buildings put back in. 

Day 167


Next was a lesson in rendering so the book wanted to show me how to export the animation. Here I've imported the walking animation I made previously into the alley scene. 


Everything I've made so far has just been using Maya's default rendering engine. On the left, you can see it creates decent shadows but no reflections. On the right, I've switched over to a more light focused rendering engine and now you can see a proper reflection. Here Maya sends out photons of light and tracks them. Above the reflection quality isn't that great. I can fix that by changing settings and increasing the amount of photons which will increase the rendering time as well. Finally below, we have another rendering engine that produces cartoon looking vector images.

Day 166


Now to light the scene. Above I've created three point lights and placed them on the each of the bulbs of the lamp posts along with giving them a yellowish color.


Then I turned on shadows and everything gets plunged into darkness. Unfortunately there's a lot of things in the scene that blocks the light.


Next I added a glow to each of the bulbs so they look like actual light bulbs. This glow effect doesn't actually generate any light in the scene but gets applied at the end during the rendering process. On the right, I changed the light so that they get weaker as you get further away from the source. This makes things even darker so I had to increase the intensity of the light. Now it's very bright near the bulb so there's a bright spot on the wall of the front building that I don't like.


Another light source is the moon so I created a blueish light to cast down onto the scene from above. I also made the moon have a glow as well.


Here I'm putting in a lens flare effect for the front most light bulb and below I have the finished set up.

Day 165


Maya has a variety of deformers that can be useful for modelling or animating. Above I'm starting out with a basic tree. I then drew a line that followed the tree trunk so now when I change the line, the tree will follow along. 


On the left, I have a modification tool where I click a point on the tree and colors will appear indicating the area of effect (yellow changes more compared to red and then none further away). So I can use that to move, rotate or scale different parts of the tree. In the middle, there's the basic bend deformer. On the right, I can deform the tree by manipulating the cone represented by the two circles. 


Here on the left is the squash deformer that I also used on the tires of the scooter. What's nice is that it isn't just making the tree shorter but fatter in the center too. Next is a twisting deformer and then a wave deformer. Below is showing how you can apply multiple deformers and that the order you apply them matters. On the left you have a cylinder followed by a bend deformer and then a wave deformer is applied on top of that. On the far right, you can see the result if a wave deformer is used prior to the bend.


Day 164


Now a lesson in painting tools. Maya has typical paint brush tools like a normal drawing program but it also has more specialized brushes like one that makes clouds. So I just have to drag my cursor across the screen and I can make a ribbon of stars will appear. In Maya, I can paint two dimensionally like above or I can paint onto a three dimensional object I've created.


I can also paint and create three dimensional things. Back to my alley scene, I used different brushes to paint in some grass and flowers. Below I've also put in some trees. If I drew a long line, a row of trees would have popped up. So I just have to draw a short line to get a single tree to appear. I also put in some benches which were another brush that Maya had.


Day 163


Now I have to rig the scooter for animation. It was different when I had to rig characters since for the most part, they were a single geometric shape so I needed to create a skeleton to govern now each part will move. Since the scooter is mechanical where parts move independently of each other, rigging is a little simpler. It becomes more of an issue of organization of all the components that make up the scooter. The scooter doesn't have a lot of moving parts so I just need to group things that should logically go together. So above, I've grouped the main frame with all the parts that should move together as a unit. Then a separate group is the steering handles and the front wheel which should turn together. The last group is the back wheel assembly. I can also put groups within groups so each set of tires and hubcaps are grouped together so they can rotate as the scooter goes.


Here's showing the handles turning together with the front wheel. Next, I put in a deformer that will squash the tires when the scooter as a whole gets moved down towards the ground. I also created a connection between the position of the scooter and the rotation of the tires so now as the scooter moves forward, the tires will rotate automatically.

Tuesday, February 19, 2013

Day 160


Now to texture the bike. In the past, I've written a lot about unfolding models so they can be textured correctly. However with nurbs, I don't have to worry about that since the texture mapping is done automatically. Problems do arise though with stretching of the texture and pinching at the poles of spheres. A checker board pattern is applied to the whole bike and you can easily see how very little of the scooter has uniform squares. Luckily though, colors will be broadly placed so it won't be too much of an issue.


Here I've placed a basic blue texture onto the bike. Then I created a gradient along the back to look like dirt. They provided textures for the seat and tires so I applied those. I tried creating my own metal texture for the hubcaps and other metal parts of the bike. I won't be sure how those actually turn out until I use realistic lighting. Right now the default lights make it look more like plastic. 


I mentioned pinching problems at poles of spheres which was an issue when placing the headlight texture on. I had to use an alternative method that I won't go into.


I placed a honey comb type pattern on the bottom where the feet go. You can see how it's more stretched near the back. The book didn't go over how to fix that though. Anyway, here's the final scooter. 

Day 159


I've worked with polygons a lot but there are also curved surface types in Maya called nurbs. Except for my very first book, I haven't spent a lot of time going over them so I was happy to see this book focus a bit on them. Here I'll be making a scooter (mostly) out of nurbs. So I start with the tire by drawing a cross section curve and then revolving that to make the tire. For the hubcap, I drew another curve and revolved that as well.


Next is the part of the scooter that covers the front wheel. I started with a nurbs sphere and squashed it and then made it bigger than the wheel. Then I drew a curve, projected that curve onto the sphere and then deleted the bottom portion of the sphere.

Next is the main frame of the bike. Previously, I've drawn two curves and created a surface connecting those two. Using the same technique, I started with a circle, squashed it and then duplicated it a lot and positioned them accordingly. Then I was able to connect them all together.

I used the same method to make the cover for the steering column. The headlight was created with some simple nurb shapes. The rear engine cover started out as half a nurbs sphere. The seat was created by drawing two top view curves that were then connected with surfaces which were then pushed and pulled to get the right shape. 


At this point the rest of the bike was made using polygons which included the handle bar assembly, suspension for the tires and the springs and base under the seat. Some of the parts have an trim on the edge. This was created by making a small circle representing the cross section. Then I selected the edge I wanted and a tube was formed along that edge using the first circle as a guide. 

Monday, February 18, 2013

Day 158


This is the most complicated skeleton rig I've done so far so animating it to walk was a bit of a challenge. For the most part, the book told me how to do all the posing for the legs so there wasn't much learning through trial and error there. The arms I had to do on my own for the most part. I found the IK chains there to be more of a hindrance than helpful since I had much less control. It also didn't help that the book didn't want me to make a lot of keyframes. Keyframes are the main poses I set while Maya interpolates the frames in between. Anyway, I have the final animation below. It's not the best. He's walking a little too fast and it's herky jerky so it's not natural looking. I forgot to mention in the last post, but one more thing I did to the skeleton was add a jiggling attribute to the ears which you can see the results of in the video.


Day 157


Now I'm using blend shape deformers for facial animation. I made a few copies of the original dog and tweaked the geometry in different ways. Here I made a smiling face, sad face, eyebrows up and eyebrows down. Then I sort of linked all these back to the original and each pose kind of becomes its own adjustable variable. So the original face would be 0, the eyebrows up face would be 1 so then a value of .5 would be something in between. 


Now I have four facial attributes and I can put in different values for to make different facial expressions. Doing just simple combinations of the first two faces with the second two, I get a sort of evil, surprised, scared and not too pleased face. 


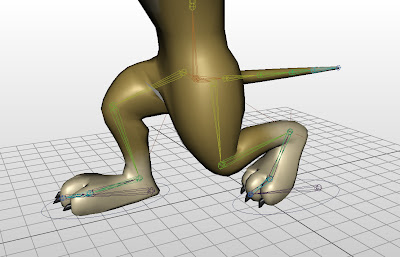
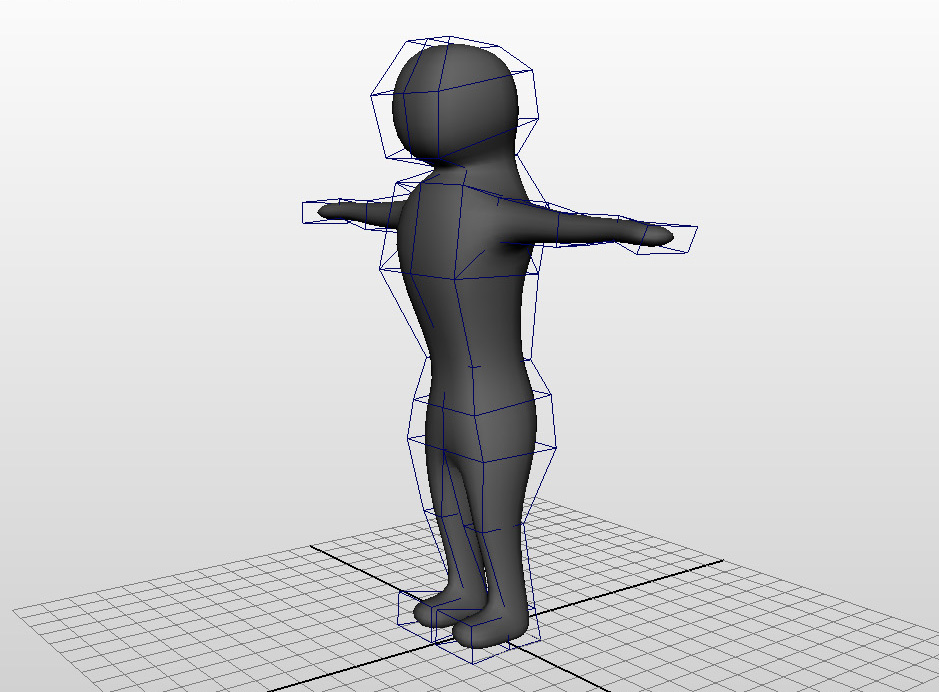
With that done, I moved onto refining the skeleton I made previously. This involved making IK chains. This is probably the third time I've talk about them so just to be brief, they're kind of a short cut that allows me to move the foot around and have the knees follow along automatically instead of having to rotate all the joints by hand. This is especially important for the legs because you want the feet to make contact with the ground so it's easier to sort of lead with the feet. I said I've done this a few times, but unfortunately, every time is different which makes it hard to completely grasp. This dog has the most complex set up I've done so far. I could understand what was going on as I was doing it, but I probably could not replicate it on my own. 


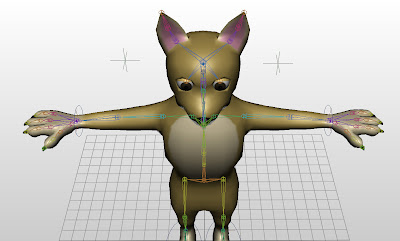
After the legs, I made IK chains for the arms which is a first. All the times before, I just animated the arms joint by joint because hands can go anywhere and I don't have to worry about making contact with the ground or producing the roll the foot does when we walk. But the book wanted them on the arms and I must do what the book says. The chains are much simpler than the leg ones. To balance the simplicity, I've added control points (the hovering crosses in the picture above) which each elbow will point to. With IK chains, Maya will guess how the elbow will bend and these points will give a little bit of control in case Maya doesn't guess correctly.


I added another control point which the eyes will follow. Then I made a new attribute to control blinking. Kinda of like the blend shapes for facial expressions, I set the eyes opened wide and then closed as my max and min values so they're now adjustable using just a number value.


Then lastly, I made one more new variable which is how smooth the model looks. I've worked with flipping between rough and smooth versions of my model but that was more of a preview. This attribute actually changes the model. You can see the rough vs smooth above. I wish they went over this first so all the above pictures could have looked better.

Day 156


Next I made a skeleton for the dog. It's similar to ones I made in the past, however there are some extra things like the tail, ears, jaw and eyes. After that was done, I had to bind the skin to the skeleton. The book went over a brief lesson on what happens when models bend and how to fix problem areas.


At this point, I had to redistribute how much weight each joint holds over the nearby geometry. The book said this was an advanced topic though and would not be covering it but feel free to give it a try anyway. Thanks book. Luckily, I've gone over this stuff before. It basically consists of bending every joint and fixing problems that come up. The tedious part is that I'm adjusting weights so lowering one joint will increase another. So I have I have repeatedly go back and check joints to see if fixing one ends up ruining another.


The collar isn't a part of the main geometry and is just constrained to a position relative to one of the neck joints so it doesn't deform with the skeleton. This was causing some big problems but I was able to work the neck joints so that the collar doesn't penetrate the skin during bending. While making the model, I wasn't aware I'd be making a joint to control mouth movement. Luckily I put in enough detail in the mouth to work with and it was just a quick fix to the model to get it to open and close. 

 All done.


Monday, February 11, 2013

Day 153


Texture time. So with the alien before, I spent a lot of time unfolding the model to apply the texture on. However with simpler characters, you can take short cuts. Instead of unfolding everything, I can take a straight on view of the object to make the map. The front will overlap with the back but if both sides are going to be the same color then that's fine. Here I'm using a side view of the body instead of a front view because the belly is going to be a different color. If I had used a front view, the lighter belly color would also appear on the back of the dog which I don't want. With a basic checker patter applied below, you can see how the pattern is applied from the side and not the front. It also means the belly and back area will get stretched but again having the dog mostly being one color, it won't be too much of a problem. I separated out the arms but not into left and right but top and bottom instead. This is because the paws will have pads which I only want showing up on the bottom side. So I took the two arm tops and stacked them on top of each other so they'll get the same texture and look the same. Remember blue means a single layer while pink is overlapped. Then I stacked the arm bottoms for the same reason. I also separated out the ears. Like the arms, they aren't left and right ears but the fronts and backs of the ears stacked on each other because the front are going to have a different color than the back. And lastly I have the nose.


The book told me to paint directly onto the model which kind of worked but wasn't that great. It just didn't have enough precision. So I ended up exporting the texture map and fixing things in Photoshop. The end result you can see below.


And finally here's the model with the texture applied. It's finally starting to look more like a dog than a cat.

Day 152


Time is model my character. This book advocates the technique of starting with simple shapes and then adding in details from there. The book didn't provide any reference images so I had to play a little by ear. The character is a dog so the proportions are a little funky. Here I'm working with rough polygons while viewing how the result will look like when smoothed.


Here I'm finalizing the body shape and adding in fingers and toes.


Now here's a big jump to the final model. It looks too much like a cat to me. The ears will eventually be folded down so maybe that'll help. I wanted to make the snout longer and more doglike but the book shows the dog with a shorter snout. The book's model looks more doggish but I didn't want to drive myself crazy trying to copy the book perfectly.