Monday, November 26, 2012
Day 73
The sunlight I used last time was built in and easy to use. Now I'm going over how to more directly control the lighting. This chapter has a lot of information and less hands on type stuff. There's various types of lights with different effects and functions and of course many ways to tweak them. You often have to use a combination of types to create a realistic look.To make a bare light bulb, I used a downward pointing spot light. Then I created a glowing sphere so it looks like the light is coming from the bulb.
Day 72
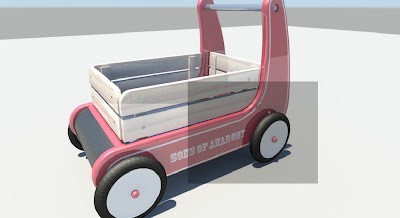
I'm done with animation for the time being and now I'm moving onto lighting and rendering. Each one has their own chapter but they're both very interrelated. On the top left is the wagon I textured awhile ago and how it looks in my workspace. On the right is the same wagon rendered using built in sun light.
Rendering takes a bit of time so what's cool is I can highlight smaller parts and just render those to check changes I make. Here, I toned down the brightness and removed the reflection on the wood panels.
Here's the final render after I adjusted the sunlight to be more towards twilight.
Wednesday, November 21, 2012
Day 69
I went over some basic facial animation. I duplicated a creepy looking face and made it smile. Then with some magic, I could now make the original face smile a little or a lot via a slider. Next I made another duplicate and raised its eyebrows so now I could do the same with the original face. The main idea is that you can make a number of set poses and then by manipulating all the sliders you can create a variety of facial expressions. This is probably more advanced stuff than I need to know right now. There were more online lessons regarding animation but I figured this would be a good place to stop and go back to the book.
Day 68
I jumped away from the book again to the online lessons. Those went over making skeletons and how to fix deformations again. Then they had me animate another walking guy. Below I used inverse kinematics instead of forward kinematics. I still have body parts attached to a skeleton. However now I have another chain here linking the foot to the hip. Now I can just move the foot and the rest of the leg moves along naturally. So forward kinematics would be like you yourself moving your arm. You determine how each part moves. Inverse would be like someone holding your hand and moving it around. Your arm follows along with the hand movement by itself.
Day 67
Next I animated the wheels of a train. Here they were showing me how I can link different objects together so when I move one, everything else moves along with it. All the parts are linked to the middle wheel above so I simply set that wheel to rotate and everything else fell into place.
Day 66
So the previous guy was just made of floating blocks which was simple to animate. However when you work with more realistic things, problems can arise like how the skin of your model reacts to being bent. Those areas tend to get smashed or distorted or worse. Above is the skeleton I made that goes inside the hand. Then I bent the fingers and my book showed me the various ways I can fix deformities around the joints. None of the methods seemed particularly quick and easy or produced great results though. I was going to animate the hand to flash some gang signs or something but I wasn't happy with the initial skeleton set up they had me do so I just moved on.
Day 65
So here's an animation of a walking dude. I created a skeleton of movable joints and then attached the body parts to the skeleton. Then I can move the joints around and the body parts will follow suit. I used a technique called forward kinematics to animate the body. It is called this because for example if I rotate the upper arm, everything down the chain ending at the hand will rotate the same amount. Things done at the root will move forward down the chain. It's easy to grasp but can take a lot of work because you have to rotate each part yourself.
Subscribe to:
Posts (Atom)


