Friday, April 26, 2013

Day 222


In my book, the guy has an ape-ish, ogre type face. For some reason, I didn't want to do that so I just did my own thing. I didn't have any ideas ahead of time so I ended up doing everything off the cuff. There are two breaks in the video where I paused the recording which you may not notice. The first time, I paused to create the two eyeballs. I didn't place the second eye correctly so it looks too sunken in but actually it need to be moved to the side more. The second pause came when I was working on the ears. Because I stretched out the ear so much, the polygons were elongated and the sculpting wasn't looking right. So I paused to increase the number of polygons and forgot to turn the recording back on. By the time I noticed, I was already finished with the ear.


After recording the video, I made small changes and adjustments. I added a little bit of asymmetry. I think the head looks alright although I don't think it matches the body very well.


Day 221


Next I sculpted the hands and feet. The nails were a little tricky. The book provided a stamp for me to use to create each nail which was helpful. However, I still had to do a lot to make them look right. They could still be much better but I could spend hours tweaking little things so I just made myself stop.

Day 220


I was going to record a video of myself doing the legs but in the middle of doing that, I didn't think it was that interesting so you'll have to make due with just pictures. The leg muscles were a little bit tougher since I don't look at legs as much as arms and they're more subtle, especially the thighs. Below is a video of what I have so far. To do the legs, the book had me increase the number of polygons so I was able to go back and add in more detail to the upper body as well. 

Day 219


I'm switching back to my other book since it is more anatomy focused and I wanted to learn some of that before finishing my female character. For that book, I made the little girl head and now I'm doing the near opposite with a big muscular guy. This guy has like super hero proportions so it's not quite anatomically correct but it's a good lesson in learning the main muscle groups. Above is the model I was provided to start out with. Below is a video of myself sculpting the upper body. This was the first time I sculpted using a tablet so there were some growing pains. In the video, I'm roughing out the muscles. The polygon count was intentionally kept low so I did the best I could with what I had. There's not too much to explain that you can't see for yourself. Mainly I just built areas up or down and then smoothed things out and over and over.

Tuesday, April 16, 2013

Day 217


Now I'm going to take the model made in Maya and pose it before I start to really sculpt. Mudbox has a basic human body figure built in. However the book wanted to create a simpler version with less polygons because it's easier to pose. It's kind of like the wooden mannequins artists use. There are less moving parts you have to deal with. The model here is also fairly chunky but when I go to smooth everything, it'll shrink down. So below you'll find a video of me posing the model with a description of what's going on below.


So you'll see me creating joints to move parts. Some parts are easier than others. If you remember awhile back, I would often complain about working with skeletons in Maya and having to check each joint to make sure they bend the model correctly. I have to do the same thing here. If it wasn't bending right, I'd have to go back and change the weights of the joint (the green parts). Anytime you see me wiggling the cursor around, that's probably what I'm doing. You can see it took me a lot longer to get the second arm bent. One reason is that I forgot to move the pivot point of the joint up after I created it. Midway through the video, I increased the number of polygons so the model smooths out and looks more realistic. At this point, I start using some sculpting tools. Just the grab tool and the smoothing tool to move parts around and begin to create the shape I want for the body. I still used the posing tools every so often for large movements or to rotate something (which the grab tool can't do) The smoothing tool was very useful to turn the blocky hands into a more natural shape and to fix any problems the grabbing caused. Then I spent quite a bit of time getting the fingers in the right position.


Some parts still don't look quite right but that will get fixed when I actually start sculpting.


Day 216


Another set of features Mudbox has are posing tools so I don't have to depend on other programs like Maya to move different parts of my model around. To start out, I have to create a joint which you can see on the above left. I click to place the joint and then drag in the direction of the part I want to move. How far I drag determines the green gradient formed. The intensity of green indicates how strongly the joint influences that area. I can edit the green part by erasing or adding on using basic paint tools.


Once I have that set, I can move the green section around or rotate it in any direction.


I can also scale the section if I wanted to. So with those basic tools, I can pose the model in a much more dynamic fashion.

Day 215


My next project is modeling a female character. The book wanted me to start by modeling the basic shape in Maya. Since I've done a fair amount of modeling in Maya already, I skipped that step and used the model provided by the book. I will be eventually painting the character so I have to make sure the model has a good unfolded map. I could do this in Maya as well but the book directed me to another small yet powerful program made just for unfolding maps. Above is a screenshot of what the program looks like along with the base model I'm starting out with.


If you remember from awhile ago, to unfold models I first need to cut them apart. What's nice is that this programs visually cuts the model apart so you can see how you're chopping it up and any possible mistakes you made.


Here are all the cut up pieces ready to be unfolded. Below you can see all the parts unfolded and arranged to form the map. Ideally I would want all the pieces to take up as much space as possible so none of the map gets wasted, however the book said I didn't need to worry about that. You can see that some of the faces have a red or blue tinge to them. Another cool thing at this program is that it tells you areas that are too compressed or stretched out after they've become unfolded. That's indicated by red and blue and how intense the color represents how badly stretched or compressed it is. So I can move around some of the points on the map to lessen the color intensity and get a nice even map for future texture painting. This model is pretty simple so I probably didn't need to use this program, however I image it will be useful for future projects.

Day 214


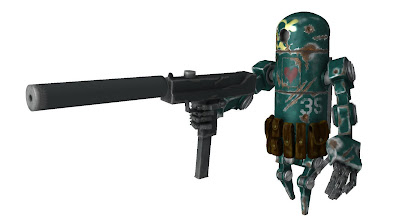
Here's the robot with my final paint job. Mudbox has some filters it can add to the model. One is depth of focus which I used with the egg before. Another is ambient occlusion which is the shadows in the corners and crevices. I turned it on here which darkened the robot slightly to better match the dark pouches and gave a more realistic result overall.


I didn't mention it in the previous post, but another paint group I had were the big screw looking things on the joints. I didn't paint these and just left the bare silver metal layer showing. I only just painted some shininess on them.


Here's the actual two dimensional texture map. You can see how many parts the robot was actually made of and why painting these in Photoshop would have driven me crazy. While I was painting, I noticed that some parts on the body were coming out pixelated. Now I can see why when I look at the map. The three body sections are in the lower left corner so not much of the map is dedicated to those parts considering they're a main focal point. If they composed a larger portion of the map, then the painting there could have been more detailed.


Below is just a zoomed in view of that corner. You can see parts for the three body sections, the gun, the engine, some pouches and other random parts.

Day 213


Now that I have a working computer, I went back and finished painting the robot. Above is the rest of the main body. I used the same methodology as I did with the head. Since it's the same, I didn't feel the need to record a video.


At this point, I was pretty tired of painting since I was doing the same thing over and over again, but sadly there was much more to go. Above, I've isolated all the parts that still required all the layers of paint that I've used before (base metal, green paint, rust).


Next I moved onto the next group of secondary parts which included the fingers. I just wanted to paint these a dark grey but they ended up looking too flat and plasticky. You don't see it here, but I went back and painted on black dots to break up the gray. For the backpack engine, I partially erased the dark gray to reveal the raw metal beneath. That still didn't look right so I had to rust up the whole thing too.


Next were the pouches which I wanted to look like worn leather. I made the bottom layer a dark yellow and painted brown over that. I then erased some of the brown to expose the yellow underneath. The default surface material of the model was shiny which I didn't want for the leather. I guess I could have changed the material but I didn't try that. Instead I painted shininess all over it. I can pick the color of the shine, so I changed it to black which dulled everything. It was still a little too brightly colored so I painted another layer of black on top of everything. While I was working on the pouches, I had the robot hidden away. So when I turned the robot visibility back on, the pouches ended up being much darker than the robot unfortunately. Below is the gun. I didn't put much effort into it since I was pretty tired at this point. Glamour shots in the next post.


Day 212


This chapter was about other tools or useful tips in Mudbox. One nice thing about the program is that I can mirror my actions while sculpting or painting onto the other side of the model. I used this a lot when I made the girl's head. Mirroring works when the model is symmetrical but sometimes you have to deal with an asymmetric figure. Luckily, you can tell Mudbox where the line of symmetry should be. So the figure above was modeled symmetrically but is posed asymmetrically.


All I have to do is select two faces that are on both sides of the midline and then Mudbox can figure out how to mirror from there. On the above right, you can see my brush on the left hand and a dot on the right hand indicating that whatever I do on the left hand will happen on the right hand. 


With my new found symmetry, I can now sculpt one one side and have it mirrored on the other. I was just messing around and ended up making this vagina faced monster. I unfortunately didn't record a video since I wasn't planning on actually doing much sculpting. Not that the face is awesome or anything. I just want to see how I arrived at this point when I started out just making a normal face.


I did another lesson using the masking tool to make this wetsuit guy. Masking is like erasing but not permanent. So here I have two layers where one has a version of the guy slightly plumper. I can use the masking tool to paint certain areas so that the thinner model is revealed below. Unlike normal erasing though, the masking, which is shown in red, gets saved so it can be changed or removed later on.

Day 209

I spent a few days figuring out what computer I should buy. Since I have limited funds, I wanted to make the best choice. The most cost effective method would have been buying all the parts separately and building the computer myself. Not only would this have been cheaper, I would have ended up with a more powerful computer compared to a similarly priced pre-built one. However, I didn't want to do that. Even though I probably would have been successful and there's plenty of guides and information out there along with friends that have built PCs in the past, I just didn't feel like it. So pre-built computer it was.

I wasn't looking to spend a lot of money. Considering my brother's five year old laptop could run Mudbox decently enough, I figured any current computer set up would probably work. I was just looking for 8 gigs of ram and a dedicated graphics card. I found a set up that looked pretty good but it was a AMD processor instead of an Intel and the graphics card was technically integrated and not dedicated. After doing some research on the card, I found out that it's much more powerful than Intel's integrated graphics card and was comparable to other decent dedicated cards. So it seemed good enough but I was worried about how Mudbox 2012/2013 checks the graphics card before loading and if this one would work. Despite that, I still bought the computer and if I needed to buy a new graphics card then I was ok with that.

A few days later, the computer arrived, I installed Mudbox 2013 and.... it worked. It handles the program much better than my brother's laptop. I'm just estimating but it seems at least five times better based on how long it takes to save big files and how it handles multi-million polygon models. If I ever do need more power, I can still get a new graphics card and upgrade the ram too. The only downside is that I bought only the tower so I'm using my TV as a monitor. My TV screen is more than big enough but the resolution isn't that high. It's not that big of a deal except for different things on the interface like menus and buttons being too big. But overall, I'm happy with the computer. Hopefully, technical problems will now be a thing of the past.

Tuesday, April 9, 2013

Day 208


After making the turntable video in the last post, I decided to make a higher rez version of that since the video's file size wasn't that big. While that was processing, Mudbox crashed. Bad news cuz I did not save any of my painting work. Since I was being recorded, I didn't stop to save at any time. I knew I could pause the recording to save, but I wasn't expecting the program to crash. So I had to start over. More bad news, in the middle of doing the head, the laptop died. I had to do the overheating thing again to get it working. Then I hurriedly painted the head you see here (without recording myself). 


I switched the color of the decals so they'll stand out more. I changed the placement of the skull a bit so some of it got obscured when the rust was applied and it doesn't look much like a skull anymore. I also used a second image of rust to paint the more orange area which I think looks better. There's some pixelation on the decal and other areas. I could have fixed that but I was too worried about the laptop blowing up at any second. With the head done, I moved on to painting the body and then the laptop died again. With that, I finally conceded that using my brother's old laptop was not going to work out. I thought maybe I could do the sculpting on my laptop and painting on his to ease the load it experiences but it looks like it can die even after a few hours of work. If it could have lasted a few days between reheating, I could have lived with that but daily is just too much. So it looks like I need to buy a new computer.

Day 207


Now with all the dents and scratches done with, I can paint the robot. I started with a base coat using an image of galvanized metal and painting that all over the robot. The robot is actually made up of a lot of separate pieces so next I focused on the head dome and hid everything else. Below you will see the video of myself painting the head. The book provides instructional videos for the different chapters and I was able to watch the author paint the head. However even though I knew what to do, it was still the first time I'm actually painting and using the various tools. Plus I knew I was going to record my work so there was the pressure of not messing up along with going as fast as I could so the video wouldn't end up being too long. With the settings I used, I think the video is going about six times faster than real time. Below the video is a description of what I was doing so you can read that before watching the video.


On top of the base metal coat, I painted another layer using an image of green camo as a stencil. Stencils appear overlaid on top until I start to paint and it'll go away. After covering most of the head, I used an erase tool to remove paint in areas where they would be chipped off like on the edge where the head meets the body and around the eyes. Then I removed paint on the scratches and bullet holes. I used a different stamp shape to scuff off paint on various dents. Next, I used an image of rust as another stencil to paint rust on different areas. After that, I applied some decals. The skull and crossbones was placed on the face so the skull eye is over the robot eye but it doesn't look that great. With the decal painted on, I then erased parts so it'll looked spray painted on with areas worn away. Last, I made a layer for shininess. It works the same way as painting with colors. I applied the shine to areas where the metal was exposed. I also put some on the decals since that paint could have a different shine compared to the camo. I ended with turning the head slowly around so you could see everything but at six times the speed that didn't work out. Instead below you'll find a turntable video Mudbox so kindly made for me. 


On a side note, I've never posted videos on Youtube before and I was pretty impressed with the options it gives you. I uploaded these videos and it said that they looked a little dark and asked if I wanted them to be brightened so I said (clicked) sure. Unfortunately, they made them a little too bright. You could see the painting better but the shiny parts were just too bright. So I switched the first video back but left the turntable video brightened so you could see what I painted better. The shiny parts are still too bright but you can blame Youtube and not my painting skills. In the future, I'll probably record higher rez videos since the file sizes didn't end up being that big.

Day 206


Next was to take the plain looking pouches around the robot's waist and make them more realistic. To make the process easier and help out my poor computer processor, I only made the pouches visible as I worked and hid the rest of the robot. Luckily there were only pouches in the front which cut down on the workload. The final result is below. I just pushed and pulled using different tools. I could have recorded a video but I didn't think pouch sculpting would be that interesting to see.


Since this is a short post, I thought I'd talk about other stuff. So this week wasn't super productive either. Some technical problems again which I'll talk about later. Usually I'm more productive on the weekend than the weekday. If I'm at home, I don't take any days off since I'm not working super hard in general where I would need a break. Anyway, weekdays tend to be less productive I think because I'm alone at home so no one's there to see me goof off and I don't feel as guilty. On weekends, my brothers are around so I feel more pressure to work. Plus I feel I need to use the weekend to make up for the rest of the week. It usually balances out where I've done enough to warrant five posts a week. If I get enough for six posts, man that feels good. However, this weekend I was in the city for Tom's birthday and the previous weekend I was at my parent's. So that's one reason why the posts have been a little light recently.

Day 205


The book doesn't want me to dive into sculpting just yet so they provided me with a model to work this. This robot here is made up of a couple million polygons if I remember correctly. The file size is over 500 mb. The first time I went to save my work, I thought the program froze or crashed. But I found out it just took a long time to save because of all the polygons. 


First up is some simple stuff. I started out with the imprint tool which allows me to imprint or raise up a single instance of any stamp instead of creating a normal stroke. I used a simple circle and pushed it in to make the robot eye. For the robot nipple, I pulled out a circle and pushed in a smaller one. The chest door required an image provided by the book to be used as a stamp. I can use almost any image I want as a stamp or a stencil if that wasn't clear before. After that, I did some more imprint work on the back area.


Next it was time to go hog wild and beat the crap out of the robot who is supposed to be damaged from battle. So I went about putting dents all over him. After that I used more precise tools to add in scratches and bullet holes. Lastly, I used a paint spray type stamp shape to create little bumps that represent rusting on the damaged metal areas.

Tuesday, April 2, 2013

Day 203


After finishing the egg, my book has a chapter devoted to the menus and interface of Mudbox. It's funny that this chapter exists. No Maya book would have something like this because the program is so huge. Mudbox though is small enough that the book can cover most of the key points without going on and on. So here's a post about the interface to give you an idea of what I have to work with. First off, above is a screenshot from Mudbox 2011 while below is from 2010. In the middle is the work area. In Maya, I can work with multiple viewpoints open at the same time but Mudbox only allows me to work with one, although I can switch to different ones while I'm working. On the top is the menu bar and below that are some tabs that will change the work space. Here I can switch to look at the UV map (the 3-D model unfolded) and I can paint on that too. Or I can switch to an interface to look at different images like reference photos or stamps and stencils. On the bottom left are the toolsets. Above you can see the painting tools and below are the sculpting tools. On the bottom right are menus to pick different stamps (above) and stencils. I can also change the material of the model there. Below I picked a chrome material. On the top right are lists where I can pick different objects in the scene (cameras, lights, models) or I can switch to look at the different sculpt or paint layers (below). Underneath that on the lower right side is the properties area. A list of properties I can change will appear for any tool or object I select. Then along the very bottom on the right is some extra info like how many polygons the model has. And finally on the bottom right corner I can set up a red box of flash to remind me to save after a designated amount of time. Nice touch.

Day 202


I said before the egg model had about 1.5 million polygons and the file size was 200 mb which is kind of overkill. Unless it's used to render still images like in an ad or something, this egg isn't too useful as it is now. Another thing Mudbox can do is output different kinds of maps. One is a texture map which is all the color that I painted. On the left I have a low rez version of the egg which I've opened up in Maya. On the right is the same egg with the texture map I made in Mudbox applied onto it. This is a much easier method compared to painting things in Photoshop.


Another kind of map Mudbox can make is called a displacement map. Mudbox looks at the surface of the million polygon egg and see where all the bumps and pit are and records this information in the form of a black and white map. I can now take this map and apply it to the low rez egg in the Maya and I end up with the egg on top left. The displacement map actually changes the geometry of the egg but only at the time of rendering. Before then, the egg is quick and easy to manipulate and doesn't use up a lot of processing power. So there's no slow down while working with the egg but rendering takes awhile. To speed things up even more, we can make a normal map. Normals are lines that are perpendicular to the surface of the model. Mudbox records this information as a colored map. When applying this map onto the low rez egg, Maya will use this information to figure out how light should bounce off the surface. The geometry doesn't actually change so this is a way to fake the extra detail and doesn't require a lot of computing power especially compared to a displacement map.  


Above is a picture of the two maps. Since I just made little bumps and pits on the egg, you don't really see much. I had to zoom in a lot of the maps for you to even see a little bit. If this is confusing, I did the same thing awhile ago on this blog and it may be easier to visualize. Below is a picture from that post. On the left is the high rez frog with which a normal map is generated. In the middle is the low rez version which the map will get applied to. On the right you see the final result. I said normal maps don't actually change the geometry of the model. So the model on the right has the same silhouette as the low rez version (because it is the low rez version with just a map applied). The end result is a detailed looking model that has a low polygon count and will be easy for a computer to process.

Day 201


I went back to my first Mudbox book since I can paint now. Here's my modeled egg and the reference image I want to emulate. I chose the right shade of brown and easily painted directly onto the egg.


After the base coat, I chose a lighter shade and used a dotted stamp to break up the solid color. Then I chose a darker red for the larger dots. I used the same dot stamp but increased the size. These three steps were done on separate layers in case I needed to go back and tweak them individually.


An alternative approach is to use the actual photo of the egg as a stencil. You can't see it here but the photo stencil appears overlaid on top of the egg and disappears when I start painting. Whatever is in front of my brush gets painted onto the egg. The stencil is static so I have to keep rotating the egg to apply the paint which can lead to a repeated pattern forming. With that done, I took all the painted layers and adjusted their opacities until I was happy with the result. Along with painting colors, I can also paint shininess on the egg. If you zoom in on the egg on the right, you can see the shininess I painted on using the dotted stamp again. Below I have the final result. Mudbox has some filters you can apply so I added in a depth of focus look.